
Older Revision of Accessorize Your Power Tools
Accessorize Your Power ToolsAfter seeing all of the airsoft and paintball articles on this web site, I realize that it is possible to get tactical with power tools as well. Just what does that mean? Well, a cordless drill is shaped like a pistol. What about attaching a tactical flashlight to the drill like a pistol? How about adding a Picatinny weaver rail to the power so that a battery holder can be attached? This article explores these ideas with examples and DIY how-to instructions. Picatinny Weaver RailThe Picatinny weaver rail (see photo below) is a standard created by the military and gun manufacturers to allow an assortment of accessories to be attached to guns. Accessories like tactical flashlight, laser sight, and scope can be attached. We can take advantage of this standard rail system on our power tools as well. Tactical flashlight can light up your work environment. Laser sight can help align your power tool to your project. The scope is probably useless on your power tools, but an airsoft battery box can be very useful. 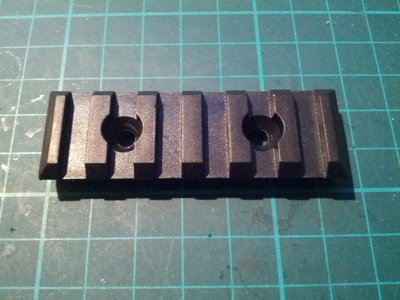
Some guns come with Picatinny weaver rail built-in. But because many guns do not have built-in rails, it is easy to buy rails. Therefore, it will be easy to acquire rails for youe power tools as well. See the "Related Links" section below to get some from Amazon. The photo above shows a plastic Picatinny weaver rail that is medium length. There are shorter and longer ones to suit your power tools. Also, the rails are available in metal or plastic. Metal is stronger and more robust. Plastic is lighter and can be easily altered for your needs. Gluing a Rail to Your Power ToolMost rails are mounted with screws. But it is not always easy to take apart your power tools. So gluing becomes the next best option. My first attempt is with super glue. But it is too brittle and just the slightest force causes the rail to come off. It turns out that the Loctite Stik 'n Seal is perfect for this purpose. This glue is a waterproof glue, which is unnecessary for our purpose. Its ability to adhere to metal, plastic, and many other materials makes it a great glue to use. In this section I will go through some examples of gluing various rails onto various power tools. 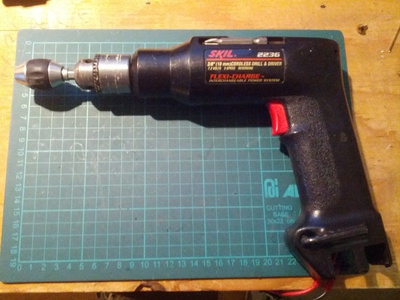
The cordless drill is the most common household power tool. This Skil 2236 cordless drill (see photo above) is over ten years old. The original 7.2v NiCd battery is long gone. But it has been so reliable compared to some of my newer cordless drills, I still use it toda. I have since started using RC car batteries with it. So it would be nice to be able to mount a airsoft PEQ battery holder to it. Like most pistols, the best places for rails are on top and on the bottom in front of the trigger. We are going to glue a top rail to it. The Skil 2236 has a clamshell design. I have taken it apart to solder a Tamiya connector into it. But if we were to glue a top a rail to it, it would be impossible to take it apart later. The solutionis to glue only half of the rail to one of the clamshell. The photo below demonstrates glue on only one half of the rail. 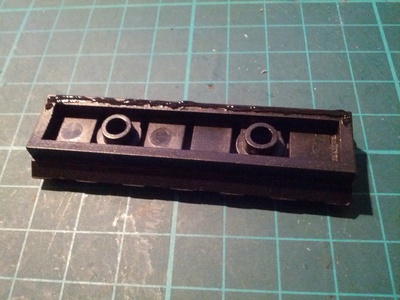
The top of the Skil 2236 ccordless drill is slightly curved on top. So a large c-clamp is necessary to keep the rail secure on the drill for the next 24 hours as the glue drys. The photo below shows the clamp keeping the plastic rail in place. 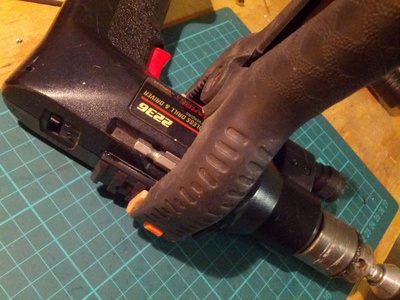
After the glue drys, the Picatinny weaver rail is ready to accept accessories. The photo below shows the final result after the glue has dryed. We will come back to this project later to accessorize it. 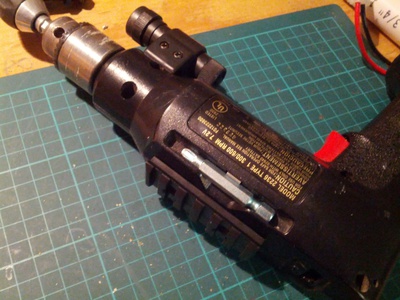
Let's move onto our next project. It is a cordless saw. Like the cordless drill, the original battery is no lnger working. It ahs been modified to power from RC car batteries. But there is no real way to store the battery inside this power tool. So it sourly need an external battery holder attachment. The idea is to glue a short, metal Picatinny weaver rail to it like the photo shown below. 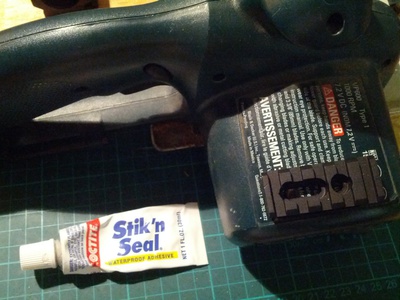
As you can see, the glue location is a curved surface. Luckily for us, Loctite Stik 'n Seal is a thick gel substance. It is perfect for filling the gaaps between the flat rail and the curved surface. But with thte amount of glue we applied to fill the gap, the glue was still spongy after 24 hours. In fact, it took the glue four to five days to completely dry. But after it dried, it feels exceptionally strong. Tactical FlashlightMany cordless drills nowadays come witha LED in front. It turns on when you press the trigger. You can do better by mounting your own tactical flashlight onto the cordless drill. Why? Because 1) you can keep it on until you are ready to turn it off; 2) tactical flashlights are much brighter (hundreds of lumen) than the LED that is built into your drill; and 3) it is a lot cooler and great bragging rights. Many tactical flashlight comes with a Picatinny weaver mount, such as the one in the photo below. This is a cheap tactical flashlight that came with the Robocop airsoft gun (the whole package is $15). But even this cheap tactical flashlight is brighter than the LED on my other cordless drills. I decide to glue this mount directtly onto the Skil 2236 as I won't be using it for anything else. 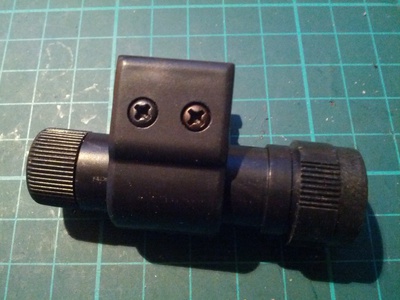
As I have mentiionnnned before, the Skil 2236 has a clamshell, so I only want to apply glue to one side of it. The photo below shows super glue on one side of the mount. I will learn much later that super glue is too brittle and that Loctite Stik 'n Seal is better for this application. 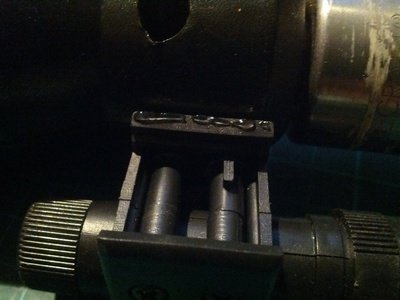
The photo below shows the tactical flashlight glued to the cordless drill. It is extremely bright. Earlier tonight, I have a chance to use it in a dark area. This tactical flashlight allows me to finish the job without pulling out a worklight. 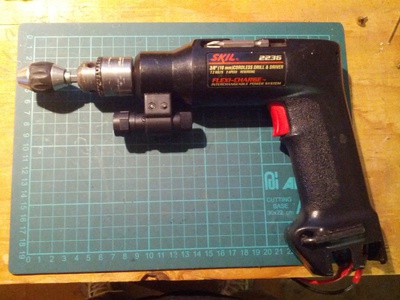
Super glue was too brittle, so the tactical flashlight came off with the slightest force. I applied super glue a second time. This tiime, I also used white sport tape to keep it in place. 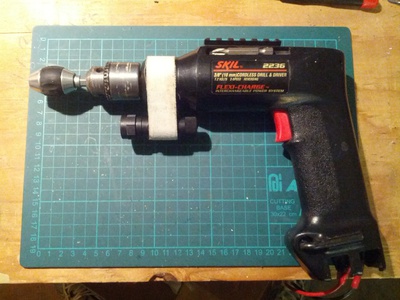
For those of you unaware, sport tape is great for jury-rigging. It stretch, hold things tight, and come off easily when you want it to. Battery HolderRetrofitting your power tools with new battery technology is always a challenge. Most power tool battery packs are proprietary, so that you have to buy the right battery for your particular tool. That means you usually cannot use the same battery pack on different power tools. I have found that converting your power tools to use standard hobby battery packs really saves a lot of money, allows you to use the same battery pack with multiple power tools, and saves you time from having to maintain multiple rechargeable battery packs. In the airsoft world, battery boxes are shaped like PEQ. Once you have the Picatinny weaver rail glued to your power tools, you can mount PEQ battery boxes to carry the battery packs. The following is a photo of the D-Boys BI-09 PEQ-2 Battery Box. This particular battery box is quite big and will allow the use of many standard hobby batteries on the market. 
The PEQ battery boxes are fairly inexpensive. It costs about $20. And you can move it from one power tool to another, if you don't mind a little hex wrench action. You can do even better by building your own stick battery holder. The following photo shows a DIY stick battery holder mounted to the Picatinny weaver rail on a cordless drill. 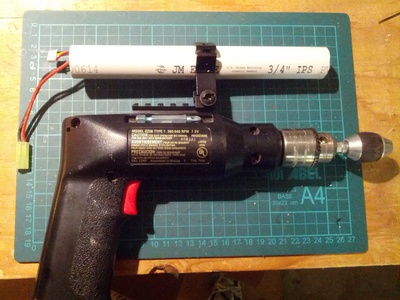
Related Links
|
Articles
|
Wiki
151 Users Online
|
|
Copyright © 2004 - 2026. All Rights Reserved. |