|
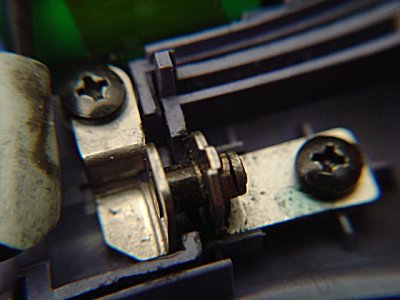
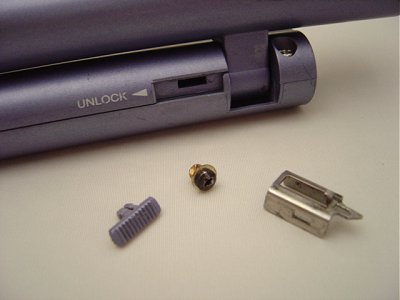
fixing the hinges on the BP52 battery packA known weakness on the Sony VAIO PCGA-BP52 battery pack is its hinges. Over time, due to the need for it to swivel so that the LCD panel could be opened all the way, the hinges loosen and the battery pack flops around like a broken window. The battery pack then becomes inconvenient and awkward to use. Despite this weakness, the Sony BP52 battery pack is actually engineered quite well. Nothing is really broken when the hinges becomes loose. All one has to do is to take the battery pack apart and tighten up all of the hinge joints and bolts. Attached Image: Chieh Cheng To take the battery pack apart, see the BP52 rebuild article. Once the battery pack has been taken apart, tighten down all the screws and hinge bolts in the pictures shown. The battery pack is engineered extremely well. All of the screw sockets are made out of metal, so nothing is damaged and can be easily repaired. Attached Image: Chieh Cheng Finally, I would get rid of the lock switch. One primary reason that the hinges loosen is due to the force put onto them when someone tries to swivel the battery pack while it is locked. I have always found the lock switch to be awkward and unnecessary. The swivel operation is a lot smooth after I eliminated the lock switch on my BP52. Attached Image: Chieh Cheng Hello, Min Tsui Hi Min, Chieh Cheng Hi Chieh, Min Tsui I used a phillips screw driver and pushed down really hard on the temper-proof screws. I kept turning it while applying a lot of force, until the friction between the screwdriver and the screw finally freed the screw. If that doesn't work for you, you can always drill the screws out. Chieh Cheng
Did your message disappear? Read the Forums FAQ. Add Comment
TrackBackTrackBack only accepted from WebSite-X Suite web sites. Do not submit TrackBacks from other sites.
No TrackBacks yet. TrackBack can be used to link this thread to your weblog, or link your weblog to this thread. In addition, TrackBack can be used as a form of remote commenting. Rather than posting the comment directly on this thread, you can posts it on your own weblog. Then have your weblog sends a TrackBack ping to the TrackBack URL, so that your post would show up here. Messages, files, and images copyright by respective owners. |
Articles
|
Wiki
50 Users Online 

|
|
Copyright © 2004 - 2024. All Rights Reserved. |
|