|
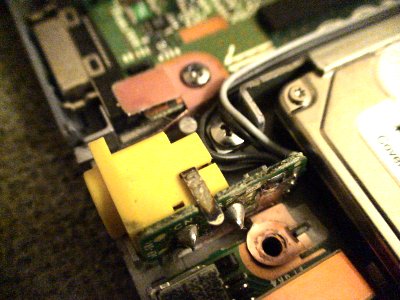
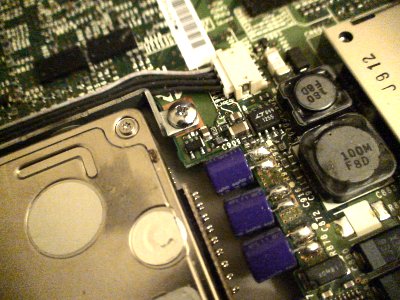
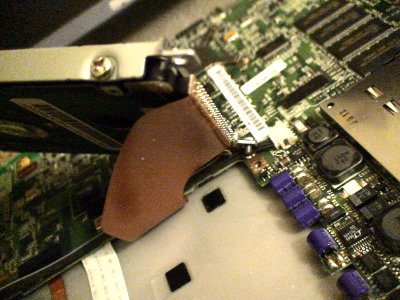
Replacing the Hard Drive on the Sony VAIO SuperSlim PCG-505TS NotebookTo replace the hard drive, first disassemble the PCG-505TS notebook. Follow the instruction from the "Disassembling the Sony VAIO SuperSlim PCG-505TS Notebook" article in the TrackBack section below. After disassembling the PCG-505TS notebook, locate the hard drive at the front left corner of the notebook case. The hard drive is held down by two brackets. After disassembling the notebook case, it is only held down by one of the brackets. Locate the bracket held-down screw by the power supply connector. The screw is under the power wires as shown in the photo below. Remove this screw. Attached Image: Chieh Cheng Next, locate and remove the screw on the other side of the bracket. It is close to where the power wire connects to the motherboard (see photo below). Attached Image: Chieh Cheng You can now lift the hard drive from the notebook case. But do it slowly and carefully. The ribbon cable is still attached as shown in the photo below. Do not damage the ribbon cable. It's surface-mount type, and very difficult to fix. Carefully pry the IDE connector off the drive. Attached Image: Chieh Cheng After removing the hard drive from the notebook case, take the brackets off by moving the four screws on both sides of the hard drive. You can easily replace the hard drive with another by reversing the direction presented here. Chieh Cheng
Did your message disappear? Read the Forums FAQ. TrackBackTrackBack only accepted from WebSite-X Suite web sites. Do not submit TrackBacks from other sites.
Title: Disassembling the Sony VAIO SuperSlim PCG-505TS Notebook Add Comment
Messages, files, and images copyright by respective owners. |
Articles
|
Wiki
58 Users Online 

|
|
Copyright © 2004 - 2024. All Rights Reserved. |
|