|
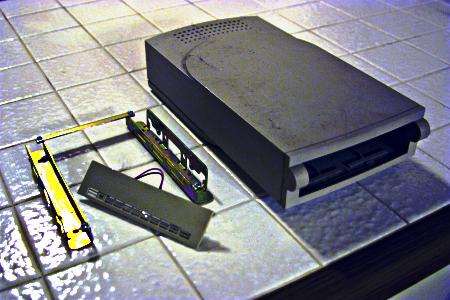
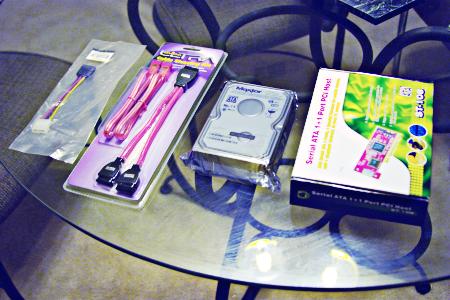
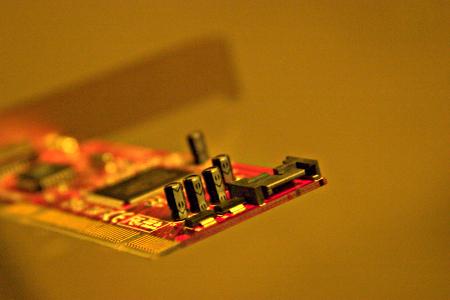
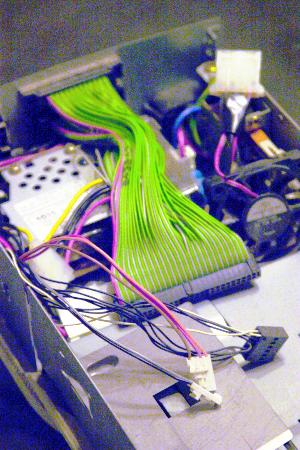
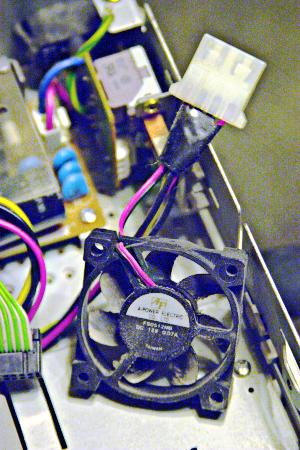
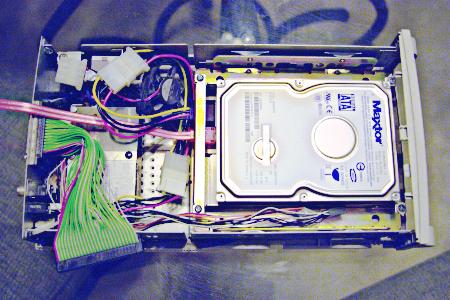
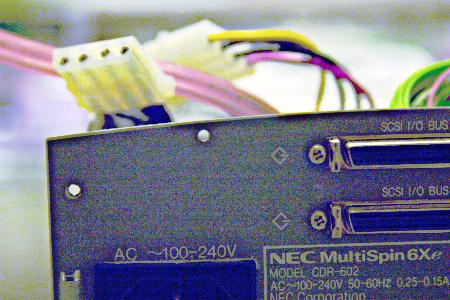
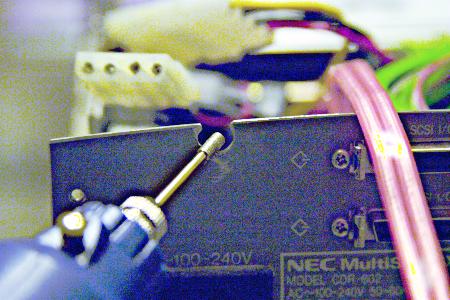
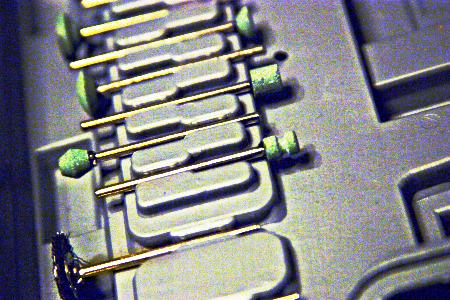
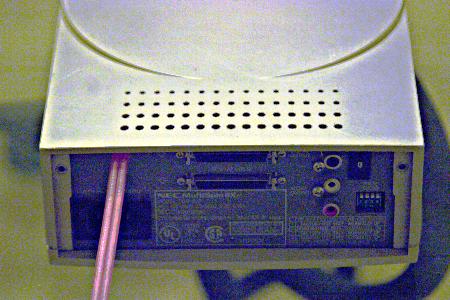
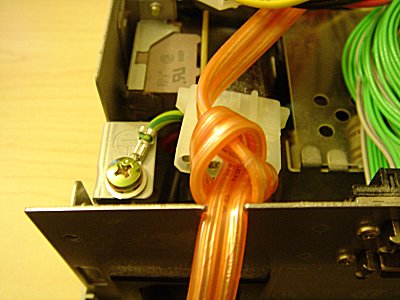
Converting a SCSI enclosure into a SATA enclosureFor a long time, MFM hard drives were the only consumer-available standard on the market. The old MFM drives were later replaced by EIDE drives. At the same time, manufacturers were making the server-level SCSI drives cheaper and available to the consumers as well. For a long time, SCSI and parallel IDE drives were head-to-head competing for the market. From the earlier days, I picked the SCSI drives over the IDE drives. Their performances were amazing. And the SCSI drives could be turned into external devices easily with SCSI enclosures; SCSI had been design for both internal and external applications. But today, IDE drives are just as fast and many times cheaper than the SCSI drives. Serial ATA (SATA), a serialized IDE interface, now makes the IDE drives even faster. SATA standard had also been designed with both internal and external applications in mind. However, the interface is so new, that there are few SATA enclosures on the market. With the few SATA enclosures that are on the market, most of them use a non-standard interface cable. Some SATA enclosures use the IEEE 1394 Firewire cable, which seems like a robust solution, but it isn't part of the SATA standard. Chieh Cheng A few weeks ago, I have placed an order for two ATA drives. One of the drives will be used as my file server. The second drive is a backup to be stored at an off-site location. Today, there are abundant USB enclosures for ATA drives. I wanted both to be external, so that they can be used on any one of my computers and carried off-site for backup. I had ordered the two drives in haste and didn't realize that one of the drive I ordered was a serial ATA drive. None of my computers have SATA interfaces. And none of the SATA enclosure on the market really fits my needs. Coming from the SCSI world, I have quite a few external SCSI cases. Most of them are just sitting around my home now. I have managed to sell a few here and there, but the demand for them is so low that people only want them during a blue moon. So I have decided to convert one of my SCSI drive into an external SATA enclosure. The rest of this article will document that process. Chieh Cheng The candidate I picked for this project is the SCSI case (see picture below) for the NEC MultiSpin 6Xp CDR-602 external CD-ROM drive. I have used this case previously with my SCSI hard drives. It looks slick and is very robust. Even though I am using a SCSI case, which is harder to find today, you can use any hard drive enclosure that you may already have. There are a lot of USB enclosures out there on the market now. You can convert an USB enclosure into a SATA case with the same instructions here. In the picture below, you can also see a 5-1/4" to 3-1/2" hard drive bracket. Back in the days, the drives were 5-1/4" wide, so this enclosure was made to accommodate the bigger drive. A bracket is needed to mount the smaller 3-1/2" SATA hard disk. The face-plate in the picture is slightly modified. I had cut it smaller in previous projects to fit this case. The face of the NEC MultiSpin 6Xp has a smaller footprint than a standard 5-1/4" drive. Attached Image: Chieh Cheng To complete this project, I needed a few things. I already have the 300 GB Maxtor SATA hard drive, because that's the mistake that got me here. A SATA power cable adapter and a SATA data cable is needed for the enclosure. I also bought a Serial ATA 1+1 Port Host Controller ST-108, because I don't have a motherboard that support SATA drives. This PCI controller board has both internal and external connectors and is perfect for this application. Attached Image: Chieh Cheng The nice thing about the SATA connector interface is that both the internal connector and the external connector are exactly the same. This design is so different from the previous storage interface designs that I have seen. For example, the SCSI internal connector is a 50-pin ribbon cable, while the external connector is a 50-pin centronic connector. Whoever came up with the same connectors for SATA is a genius! I don't know why I haven't thought up that design myself. The following picture is a picture of the internal connector. Attached Image: Chieh Cheng Here is a picture of the external connector. See, they are exactly the same! Attached Image: Chieh Cheng Let's Get Started!After having all the parts on hand, it's time to get started. I used a wet paper towel to wipe off the dust that has gathered on the enclosure over the years and took it apart. The NEC case is particularly easy to take apart. There are two Phillips screws at the back of the case. Remove the screws and release the four tabs toward the bottom front and lift the cover away. The case you have is most likely different, but just as easy to take apart. After removing the cover, the wires are revealed as shown in the picture below. There are many more wires in this SCSI case than what you'll see in today's USB cases. This case was made for a CD-ROM drive, so it included several audio cables. Plus, external SCSI devices have ID selection switches in the back that needed an additional cable to the internal drive. In this project, we will be ignoring most of the existing cables in the case. The hard disk will only take advantage of the power cable. Attached Image: Chieh Cheng The fan in the picture below is a special hack I placed into the enclosure years ago. It came off an old CPU and helps ventilate the interior. Attached Image: Chieh Cheng Once I cleaned out the enclosure, I started getting the hard drive ready. See the hard drive I got is a 3.5" drive and I had to convert it into a 5.25" drive using the mount bracket. Just two screws on each side of the drive is necessary to attach the mount. Next, I attached the SATA power adapter to the power cable in the enclosure. I noticed that the mounting bracket would get in the way of the data and power SATA cables after installing the drive into the case. So I attached the two cables to the back of the drive before mounting the drive into the case. Finally, I lowered the drive into the enclosure and screwed it in with two screws on each side (see picture below). Note that the SATA data cable is sticking out at the end of the enclosure. Attached Image: Chieh Cheng With the hard drive mounted, now it's time to route the SATA data cable through the enclosure. I wanted the cable to be routed through the back of the enclosure. It's a good thing that the SATA cable naturally feed through the back. The back of the case is made out of metal, rather than the easier-to-work-with plastic. So I decided that drilling a hole for the cable is easier than cutting one. I used a small drill bit (3/32") to start a pilot hole. Unlike wood and plastic, you can't just start drill a big hole in metal. If you do, your drill bit will catch on the metal eventually, ruining the hole or hurt your hand. You have to start with a small pilot hole (see picture below). Attached Image: Chieh Cheng With the pilot hole in place, start moving up in drill sizes and gradually increase the hole in the metal sheet. I ended up with a 21/64" drill bit. Finally, smooth out the hole with a Dremel high-speed rotary tool (see picture below). Attached Image: Chieh Cheng Make sure you use the metal sanding bit. Don't use the stone one. I made the mistake because I hardly ever use my Dremel tools (read as lack of experience). If you make the same mistake as me, you will have a stone-sanding bit with a notch in it, like the one in the picture below. Attached Image: Chieh Cheng After smoothing out the hole, route the SATA data cable through the back of the case as shown in the picture below. Attached Image: Chieh Cheng Picture below shows the final product. It's pretty clean. This SATA case only needs a single data cable and a standard PC power cable. The catch is that the SATA data cable is always attached, so that there is always a tail sticking out. The SCSI connectors in the back and the SCSI cables in the case are still functional and the case can be returned to a SCSI case at anytime. Attached Image: Chieh Cheng Might be good to put some kind of strain relief on the SATA cable where it exits the drive enclosure. Just in case... rsbohn Now I have use for those old Apple Scsi cases. If only I had a way to make them into ultra wide scsi (ironically, the ones with the skinnier connectors). cde Thanks for the strain relief suggestion. I opened up the case again and tied the data cable into a knot where it exited the case to provide strain relief (see picture below). Attached Image: Chieh Cheng Don't Use a Knot as Strain Relief! Last night, I connected the drive to the computer to do my weekly remote back up. After booting the computer, the SATA drive did not show up in Windows Explorer, nor in Hardware Manager. I turned off the computer and the drive to try again. Same problem persisted. I opened up the case and made sure all of the cables are attached and the drive spins up. Same problem persisted. Finally, I untied the strain relief nut and turned everything back on. Lo and behold, the computer recognized the drive. I had not used the drive since the day I tied the SATA data cable into a knot. I suspect that the radio interface generated when the SATA data cable is in a knot scrambled the SATA data signal. Conclusion, don't tie your SATA data cable into a knot for strain relief. Chieh Cheng great idea but do I need an to create a program for my external hdd to have an external audio out... thanks! joey reyes Why does your SATA drive need an external audio out? In fact, I don't think any hard drive have audio out . . . Chieh Cheng Lol, Your scsi hdd enclosure that you used in your guide has External Audio Out. I have been working on converting my external scsi drives into usb drives. I'm having some pin issues, as the usb only has Data+ and Data- (not counting the power and Ground), and the scsi have 60 pins most of which are send and receive. Xp!der Hi, very informative your project unfortunately I could not see any pictures. mike Wait for the images to load. If the load fails, then the Coral Content Distribution Network might be temporary down. Come back in a few hours or a day to see the images. To convert your case to IDE, you need a USB-to-IDE conversion board. You can find these boards in USB enclosures. It's easier to go SATA as this article suggests. Chieh Cheng Why would you want to convert SCSI to USB? No point to it - Even regular IDE is faster than USB, so with any external USB drive, you're losing transfer speed.. and with SCSI... woof.. why spend the extra money on a SCSI disk if you're just going to bottleneck it with USB? Grab a 500GB IDE or SATA disk on ebay, and get a $5 external USB-SATA/IDE enclosure. Dan Lapoint
Did your message disappear? Read the Forums FAQ. Related LinksAdd Comment
TrackBackTrackBack only accepted from WebSite-X Suite web sites. Do not submit TrackBacks from other sites.
No TrackBacks yet. TrackBack can be used to link this thread to your weblog, or link your weblog to this thread. In addition, TrackBack can be used as a form of remote commenting. Rather than posting the comment directly on this thread, you can posts it on your own weblog. Then have your weblog sends a TrackBack ping to the TrackBack URL, so that your post would show up here. Messages, files, and images copyright by respective owners. |
Articles
|
Wiki
150 Users Online
Get Our

|
|
Copyright © 2004 - 2025. All Rights Reserved. |
|